Total Pageviews

Saturday, November 2, 2013

Slide Adapter

As soon as the brackets were completed, I tried fitting our suspension slides on them, only to find that they do not fit. I then designed an adapter to fit the bracket and slide together, with the goal of a rolling vehicle by Boeing Day, I designed and machined the adapter to make sure I achieve my goal.

After designing, the adapters and testing it for stress, I began the machining process (the fun part).
I first started by cutting two plates that are 1 inch thick and then squaring them.


Both plates after squaring them.

 After they are square, I started facing both sides of the plate.
One of the plates after facing (I really like how the surface looks).

I then started to machine out the basic shape of the adapter down to the thickness of the bracket, which the two extrusions would fit into.

The basic shape of the adapter (rough cut).

After getting to a certain depth, I then machined the dimensions of the extrusions to fit the slot on the bracket, when that is done, I began drilling holes that will fit the bolts from the adapter to the slide.

After drilling the first hole.

When I drilled all the holes, I had to countersink the holes for the bolts that attach the bracket to the adapter, as the bolt heads will prevent the slide from fitting onto the adapter (I did not take a photo of the countersink, it is basically a slot from the center of one hole to the other at a depth of 0.2 inches).

When I finished the first adapter, I began working on the second one.

Second  adapter after facing the surface.

Second adapter after all the holes are drilled and the extrusions are the correct dimensions.

The back of the second adapter, before I countersink the two holes that are parallel.


 After a few hours of machining and another few hours of filing, the adapters fit into the brackets nicely. I then put the bracket, adapter and slide together and had another member of Supermileage, Matthew, install the rear wheel and chain on the vehicle for Boeing day

.

Rear wheel assembly with new brackets and adapters.

Old brackets (4 pieces welded together)

Conclusion:
The adapters were fairly simple to make, the only difficult part was filing the extrusions to fit the slots on the bracket and filing the fillets in the brackets to fit washers. The new rear assembly enabled the vehicle to be rolled to Boeing Day at CSULA.

Sunday, October 27, 2013

Boeing day


On Boeing day, there were many high school teachers and students asking me question about our Supermileage project. I don't remember how many times I have explained about how the car works and how our team made this happen. But at the end of the day I realized how much work we have done and how much we have accomplished even though the car isn't perfect. People made complements which made me smile and I am proud of myself. But do I stop here? No, it's time to step up and move on and make it better !

Sunday, October 6, 2013

some L.E.D actions on our current SMV

Here is the Main kill switch with a 12V built-in resistor Red LED

Here is another Green LED on the instrument panel along with a push-start-engine button and a bike computer


Saturday, October 5, 2013

Rear Wheel Brackets

I am currently in charge of the machining and manufacturing for CSULA SAE Supermileage. The rear wheel brackets are machined out of a single block of aluminum, we decided to make a one piece rear wheel bracket because first, our old brackets do not fit the blind plate holes and therefore gave us a reason to make new ones, we additionally did not want to rely on other people to weld together our brackets (the old brackets were four different parts welded together). A single piece bracket therefore will have more strength than a welded together one as we do not have to worry about the weld's penetration in the metal. The process however, takes quite a bit of time (so far, I have spent 10+ hours on trying to make two, and I am not finished yet).
Derek and I took turns cutting the stock (2.5x2.5x34 inches) with the handsaw because all the horizontal band saws were down..
I then faced the blocks (x2) with an endmill to get that shiny smooth finish and made the blocks 5.25 inches long.
The two blocks were both about 5.25 inches long (off by .001 inches)

I then took a 1/4 inch end mill and slotted holes .3 inches deep for the mounting holes (an endmill broke while slotting the first hole)
In the middle hole, you will notice that the hole starts out deep, but then becomes not as deep (The deep hole is where the endmill broke. I cut too deep and it snapped.). That is when I decided to make the slots at least .3 inches deep.


I then put the angle of the mill at 25 degrees and used the fly cutter to cut the angle of the brackets.
First stage of angle cut.

First block to be angled (this step requires a lot of endurance and patience as the flying cutter makes hot shavings fly everywhere and it takes a few hours to cut it. I got a few burn marks on my wrist, chest, and face. I was also covered head to toe with aluminum shavings.)

Block #2 after a few more hours and some burns.
Beginning to hollow out the block.

An hour after hollowing. (I broke the endmill shortly after).

After changing the endmill to a bigger one, the groove began taking shape and after an hour or two, this is how it turned out, I just need to use a ball nose to put in the fillets and it shall be a completed bracket.

First completed bracket.
After a few hours, the second bracket was nearly finished.
After going deep enough, the slots will emerge at the bottom and sides of the block.
A couple hours later, the second bracket is finished. (this bracket is a bit off from the other bracket)
Both brackets together.

Conclusion: The brackets will fit the blind plates on the rear of our vehicle, but they will not fit the suspension slides, therefore I will be making adapters that will help the slides fit on the brackets as the slides may not be used for competition as a suspension system to replace them is under development.

Friday, October 4, 2013

Back to blog posting

It has been a while since my last post two years ago...
I'm backing since I figured I can write something about SAE Supermileagein CSULA.
Currently, I am in charge of the Electrical section of the vehicle and a ACTING Captain of the team.
The vehicle uses a Briggs and Straton engine (Lawn mower engine) with an EFI kit from Ecotron.
Due to battery restriction (1.4 mah) of the Supermileage competition, I decided not to use the ignition coil and the fuel pump that came with the EFI kit. Reason is that those two components draw a lot of power from our battery. Instead, I am using magneto for spark plug and a mechanical fuel pump driven by crank shaft. The mechanical fuel has drawbacks since fuel pressure would drop gradually.

Here are a few pictures of the vehicle:


Competition at Easton in Marshall, Michigan

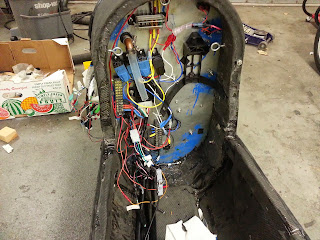
Wires are messy since I was disassembling


Saturday, May 14, 2011

[DIY] Spraying Stock Wheel Hubs

Want your wheels look special but don't want to spend too much money buying new rims ? Here is how I do it.
It's probably the cheapest and the easiest way to make your wheels look better. What I did was to purchase 2-3 bottles of black spray paints from Amazon. Then sprayed my stock rims.


The spray paint on the left is good for spraying plastic surface. We want that since most wheel hubs are made of plastic. It took me about 1-2 hour since I sprayed several layers to make the paint more durable.


Before:
Make sure you take off the hubs before you spray. You definitely don't want to spray paint into the brake system.
After:


In conclusion, I think this is a pretty easy DIY project and gave a pretty good result. Ever since that, I started noticing my neighbors doing the same thing on their cars too. This is a good project if people have limited budgets like me. From far away, my car does look like as if it has alloy black rims.

Deals

I know we all like buying electronics online. However, we usually buy them when they are on big sale.
Here are some good websites I use to go daily to check out the deals online.

http://www.dealighted.com/
http://deals.woot.com/
http://1saleaday.com/
http://www.amazon.com/( Today's deal section)
http://deals.ebay.com/